Entities
The engine supports several types of 3D objects - entities - that are placed in the level.
Entities can be created by script, or placed by WED.
They have no influence on the BSP tree, but are subject
to BSP/PVS
culling.
They are not stored in the level file, but are external files that are
read from the work folder or the path. The following types of entities
are supported:
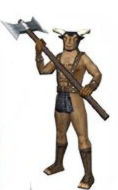
Models
|
 A
model is an animated 3-D object, stored in an external MDL
file. It consists of a 3D mesh with an underlying skeleton (bones) and
a soft 'stretching' skin. Model entities can cast dynamic shadows and
are normally used for moveable or animated objects - actors, monsters
or the like. A
model is an animated 3-D object, stored in an external MDL
file. It consists of a 3D mesh with an underlying skeleton (bones) and
a soft 'stretching' skin. Model entities can cast dynamic shadows and
are normally used for moveable or animated objects - actors, monsters
or the like.
Models are created using
a model editor program, like MED,
or can be imported from usual 3D file formats like
FBX,
3DS, X, OBJ,
ASE, or MD2. External
3D editors like Truespace®, gameSpace®, Maya® or 3D
Studio MAX® can directly save their models in Gamestudio format
by means of a plugin. Plugins for creating Gamestudio models with
MAX
or Maya can be downloaded from the Gamestudio site.
Different parts of the model mesh can have different textures,
material properties, and shaders.
|
Sprites
|
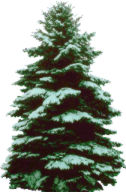 A
sprite is a 'flat' 2-D object that
can serve
several purposes. It can be placed at a wall or floor as a decal,
it can stand upright in the landscape like a billboard, or
can behave pseudo-3D by always facing the camera. A
sprite is a 'flat' 2-D object that
can serve
several purposes. It can be placed at a wall or floor as a decal,
it can stand upright in the landscape like a billboard, or
can behave pseudo-3D by always facing the camera.
Sprites are stored in external PCX, BMP, TGA or DDS files
and can be created using a standard paint program, like Gimp, Irfanview or Adobe Photoshop®.
TGA or DDS files can contain an alpha
channel which gives a transparency value for each single
pixel.
DDS files can contain
several mipmaps for better quality and faster rendering.
Sprite entities are rendered faster than map or model entities,
and can be used for explosions, lights, flames, trees, grass or
the like.
A8
If the sprite's file name ends with "_x2" or "_x3", it is rendered in the shape of 2 resp. 3 crossed planes. This is very useful for simulating vegetation. You can find an example in the infinite_terrain.c demo.
If a sprite's angles are at zero, it will
stand upright and horizontally face the camera. If its pan or tilt angle
is nonzero, the sprite will be oriented in world space according
to its angles. Four oriented sprites
can be placed in an 'X' shape for creating plants or trees. If pan and tilt both
are 0, but the
roll angle is nonzero, the sprite will face the camera in
two directions. This is useful for spherical objects, like fireballs
or explosions. For
an animated sprite (DDS
did not support
animation in A7)
, place the single animation frames beneath each other
in the image, as in a horizontal film strip. Give then the number
of frames after a '+'
at the end of the file name, like in the example explo+11.tga
below.
 |
Sublevels
(Map Entities)
|
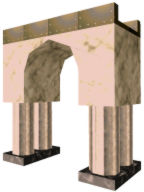 A
map entity is simply a small compiled level, stored in an external WMB
file. Map entities can be used for level parts which move as a whole,
like doors, platforms, or vehicles. Because they are nothing else
than
compiled maps, you can create them with WED. You can for
example convert each prefab into a map entity by
opening it in WED, performing
a BUILD,
and copying the resulting
WMB file into the current level directory. You'll find many
predefined doors, furniture, vehicles and the like in the prefabs
subdirectories. A
map entity is simply a small compiled level, stored in an external WMB
file. Map entities can be used for level parts which move as a whole,
like doors, platforms, or vehicles. Because they are nothing else
than
compiled maps, you can create them with WED. You can for
example convert each prefab into a map entity by
opening it in WED, performing
a BUILD,
and copying the resulting
WMB file into the current level directory. You'll find many
predefined doors, furniture, vehicles and the like in the prefabs
subdirectories.
Textures and shadow maps of the level and of map entities are preallocated
in video memory at loading time, in order to maintain smooth gameplay.
Textures of all other entity types are normally only allocated when the entity
becomes visible.
Models, sprites, or terrain that are part
of a map entity are also placed into the level in which the map
entity
is placed. This way, entity groups can be defined and compiled as map
entities. Passable, rectangular, nonrotated map entities are used by
the template scripts for water blocks,
in which actors can wade, swim, or dive.
|
Terrain
|
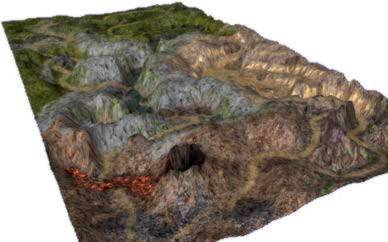 Terrain
consists of one or several textures mapped onto a rectangular grid
of
height values. It is stored in an external HMP
file. As the name says, terrain entities can be used for level parts
that are irregular terrain. They can be created with MED, or imported
from RAW height maps or BMP or PCX height image bitmaps
that are created with terrain builder programs. Terrain can't be
animated, rotated, moved, or scaled; however it can be deformed in
real time
by
the engine. It's texture is projected vertically; for that reason the
texture on slopes will look 'stretched'. Terrain
consists of one or several textures mapped onto a rectangular grid
of
height values. It is stored in an external HMP
file. As the name says, terrain entities can be used for level parts
that are irregular terrain. They can be created with MED, or imported
from RAW height maps or BMP or PCX height image bitmaps
that are created with terrain builder programs. Terrain can't be
animated, rotated, moved, or scaled; however it can be deformed in
real time
by
the engine. It's texture is projected vertically; for that reason the
texture on slopes will look 'stretched'.
Due to the huge size of a terrain, it
won't do just mapping a normal texture onto it. Even at the maximum
recommended texture size of 2048x2048 the terrain
would look blurry at close range. The simplest solution for this is adding small detail
texture that blends a high resolution sand, stone, or grass
structure over the first texture. If a terrain has a second skin,
it is automatically used for a detail texture.
An
extension of this concept is using multiple detail textures for mapping
patches of rock, grass, paths etc. onto different parts of the terrain.
The mtlFX.c environment template uses
a fixed function effect to blend an arbitrary number of textures on
a terrain. Every texture must have a blending mask in its alpha channel. For
using the template, include mtlFX.c to
your script, and apply the fx_terraintex action
or the mtl_terraintex
material
to your terrain.
Passable terrains are used by
the template scripts for water surfaces, in which actors
can wade, swim, or dive. The physics engine calculates
buoyancy and waves for objects that fall into the water.
You can assign reflective water surfaces with wave
motion to water terrains through the above mentioned Material Effects
Library.
The engine supports two types of
terrain,
unchunked or chunked.
By default, terrain is chunked, unless the terrain_chunk
variable is set to 0 or the terrain file name ends
with '_n' (e.g. "nonchunked_n.hmp").
Unchunked terrain is rendered just like a model, and must not exceed
a size of 128x128 vertices.
C Chunked
terrain its divided by the engine into square chunks
that are stored
in a memory cache, are separately clipped when outside the view frustum,
and P are rendered in
different resolution steps depending on their distance to
the camera and the terrain_lod setting.
This method allows for much faster terrain rendering and theoretically
unlimited terrain size. The little catch is that chunked terrain can't
be
used for water physics
. |
Entity selection guide
If you are not sure which type of
entity to use for a certain purpose, here a list of the differences:
Entity type |
Model |
Sprite (image) |
Map |
Unchunked Terrain |
Chunked Terrain* |
Mostly used for |
Actors, vehicles |
Plants, trees, decorations,
effects |
Buildings, platforms, doors,
trains |
Outdoor landscapes |
Outdoor landscapes |
Import format |
3DS, X, OBJ, ASE, MDL, MD2 |
BMP, PCX, TGA, DDS |
MAP, WMP |
BMP, PCX, RAW, HMP |
BMP, PCX, RAW, HMP |
Created with |
MED or external
model editor |
Paint program |
Map editor (WED) |
Terrain generator, paint program,
MED |
Terrain generator, paint program,
MED |
Polygons |
~10000 |
1 |
~1000 |
~10000 |
~1000000 |
Size |
Small |
Small |
Medium |
Big |
Huge |
Animation |
Vertex, bones, texture, shader* |
Texture, shader* |
Texture, shader* |
Shader*, deformation,
water physics |
Shader*,
deformation |
Collision shape |
Bounding
box, ellipsoid, polygonal |
Bounding
box, ellipsoid
|
Polygonal |
Polygonal |
Polygonal |
Movement |
Move, rotate, scale |
Move, rotate, scale |
Move, rotate |
None |
None |
Shading |
PRV, gouraud, dynamic shadows* |
PRV |
PRV, static shadows |
Gouraud,
static shadows* |
Gouraud,
static shadows* |
Transparency |
Alpha channel,
translucency, overlay |
Alpha channel,
translucency, overlay |
Translucency, overlay |
Translucency |
Translucency |
* Not supported by all editions.
You can place the same object either
as an entity (or a map entity, after compilation)
,
or import it as a block
or prefab into the level. If the object should move, or should be
transparent, there's no choice - it must be an entity.
Otherwise there are some
pros and cons caused by the fact that blocks or prefabs actively affect the
BSP tree, while Map entities are affected by it...
|
Entities vs. Prefabs
|
| |
Entities |
Prefabs |
| Placement |
+
Object/Add Map/Model/Terrain/Sprite |
+
Object/Add Prefab, File/Import |
| Rendering time (if visible)
|
+ Faster when complex |
+ Faster when simple |
| Rendering time (if not visible)
|
+ Faster |
- Slower |
| BUILD time |
+
No influence |
-
Slower (geometry restrictions) |
| Transparency |
+ Yes |
- No |
| Light and static shadows |
- Own lights, shadows on itself |
+ Level lights, shadows on level |
| Movement |
+
Can move |
- Fixed |
|
Actions |
+ Yes |
- No |
Automatic assignment of actions
If an entity is placed into a level, it's automatically assigned an action of the same name (without extension) if it exists in the script. For instance, on placing 'guard.mdl' the action 'guard' is automatically assigned.
Behavior
When right clicking an entity and selecting 'Behavior', a panel pops up that allows to customize the entities' behavior according to the action assigned. It's like to customize a script.
As long as there is no action assigned, the Behavior panel offers an action list for choosing an action, just like Properties->Behavior->Choose Action. If an action is assigned, you can customize the first 20 skills and 8 flags of the entity according to comment tags in the action.
Origin
For sprite entities, its origin is the geometric
center of the bitmap. For map or model entities, the origin
is its coordinate origin given by the editor. If you want the
model to be able to climb stairs,
simply place its origin into a higher position of its body.
The highest step the model can climb is given by the difference
between its lower bounding box
border and it's feet. If you don't want the model to climb
at all - if it's a car, by example - place its origin into
a low position. But be careful
not to place it too low, otherwise its bounding box may
penetrate the floor, and the model won't be able to move at
all. The origin is also the reference
point for model rotations.
Levels
of Detail
Levels
of detail (LOD)
are used for increasing the frame rate in huge outdoor levels. The rendering
of a detailed model with several thousands of polygons looks quite good
when
the model is close to the camera - however when the same model is far from
the eye point, details are less noticeably. A simpler model with few polygons
will look just as good in that situation, but render faster. The difference
in rendering speed is quite remarkable in huge outside levels where lots
of
high-polygon
entities are visible, like trees in a wood, or an ork army, or a city made
from house map entities.
Thus, use LOD for all models that consist of more than 500..1000 polygons and exist several times at different distances in your level. Using LOD for models of less than 100 polygons does not make much sense because there won't be a noticable difference in rendering speed.
With the P Pro Edition, you can use MED's LOD Manager to automatically generate levels of detail for a model. Terrain LOD is handled by the Pro Edition automatically through the terrain_lod variable. Alternatively, with lower editions entities you can manually create
different resolution models
that are switched by the engine
depending on their distance to the camera. If an entity
file name ends with "_0", it is assumed that similar files ending with "_1", "_2", "_3" are the three further LOD levels for that entity. For instance for "house_0.wmb" the engine expects "house_1.wmb", "house_2.wmb", "house_3.wmb" as LOD files.
A7 The same LOD steps are also available for material effects and shaders. If an effect technique is named "lod0", "lod1", "lod2", or "lod3", it is rendered at the corresponding LOD level, regardless whether a LOD entity exists or not. This way different effects can be rendered dependent on the distance of the entity. Give the most time-consuming technique the name lod0 and use lod1, lod2, and lod3 for simpler and faster effects.
The LOD distances can be set in the script through camera.clip_far and
d3d_lodfactor.
With the default LOD factors, the entity switches to LOD level 1
at a distance of 1/8 the clip_far value,
to level 2 at ¼ of clip_far,
and to level 3 at ½ of the clip_far range. For preventing
repeated "popping" between two LOD levels at critical distances, the LOD
levels change with a hysteresis value of 15%. If the entity
is further away than clip_far,
it won't be displayed at all.
LOD is not supported for chunked
terrain.
For correct animation and lighting, the LOD files must be the
same kind
and have the same size, origin position,
color depth, and transparency. For
instance, an animated
model can not change into a sprite
. The number and color depth
of skins, the number of frames and
the frame names must be the same on all LOD files. If a LOD
file is not found, the entity is not rendered at all at that
LOD distance. This way, sub-entities
of an entity composed of several parts can be suppressed
above a certain distance. If a model has several LOD levels,
it's shadow is calculated from one further level than the displayed
model (adjustable by shadow_lod). This way dynamic shadows
can be rendered remarkably faster. If the model is further away than
50% of clip_far, no shadow is rendered at all.
Shadows
A non-transparent model entity can cast a dynamic
shadow if its
SHADOW
flag is set
in WED or by script. Depending
on the setting of shadow_stencil,
the engine generates
dynamic
decal shadows, stencil shadows,
or PSSM shadows.
 |
 |
 |
| General decal shadow |
Individual decal shadow |
Stencil self-shadow |
 |
 |
 |
| Stencil without self-shadow |
Poisson blurred stencil shadow |
PSSM shadow |
However, if the entity does not move around and is not animated,
like a tree, you might prefer to let it cast a static shadow. Static
shadows
look smoother and are rendered faster, and are supported by all editions.
Create a block the approximate size and shape of the entity, place
it at the entity position, set it's Detail flag,
and assign all it's sides the None texture mode
for making it invisible. The block will then cast a static shadow
on the ground and
serve as an obstacle, but will not be visible. The entity can then get
the
PASSABLE
flag for faster collision detection.
Transparency
Entities can have 3 types of transparency: Overlay transparency, alpha transparency (translucency), and alpha channel transparency.
Overlay transparency means that all completely black texture pixels, and all pixels below a certain transparency threshold, are fully transparent, i.e. invisible. All other pixels are fully opaque. There are no steps inbetween. Sprites and particles are automatically overlay transparent when their texture has no alpha channel.
Alpha transparency means a uniform transparency over the whole entity texture, and is activated by setting the TRANSLUCENT
flag. It is often used to smoothly fade entities in and out.
Alpha channel transparency means that every texture pixel has its own individual transparency value. This type of transparency is normally active when the entity texture contains an alpha channel, which is the case for transparent texture formats such as TGA 32 bit or DDS DXT2..5. If an entity must not be transparent despite its skin contains an alpha channel - for instance, when the alpha channel is used for a specular map in a shader - the PASS_SOLID flag can be used.
All three types of transparency can be combined, however with consequences for their rendering. For instance, when you combine overlay and alpha transparency, the whole texture becomes invisible when the entities' alpha value falls below the transparency threshold (d3d_alpharef).
A logical consequence of translucent or alpha channel transparent objects is that you can
see other objects through them. This sounds trivial, but means that transparent or translucent entities must be rendered after all opaque entities (see rendering), and must not write into the 3D card's Z buffer.
Thus their depth-sorting is not pixel-accurate, but only object-accurate.
They won't hide other polygons or other parts of the same object. This can cause visible sorting
errors on the screen when triangles of transparent models intersect
or overlap. The errors are normally hardly
noticeable,
but sometimes very obvious - expecially when the alpha channel is almost opaque. When you see such sorting errors, be aware that this is not a bug and complains to Gamestudio support are futile. It's a consequence
of how all today's 3D cards deal with transparency.
The normal solution for preventing such sorting errors is
to split a transparent
entity into several sub-entities that are then individually
depth sorted.
You can also have an entity consist of transparent
and nontransparent groups. Depending on the type of the game, setting the d3d_entsort variable at 2 can also solve sorting problems.
► latest
version online