| Material name | Assigned to | albedo | ambient | diffuse | specular | emissive | power | Remarks |
| mtl_flat | flat blocks | 100 | 200 | 150 | 0 | 0 | 2 | |
| mtl_shaded | shaded blocks | 0 | 200 | 200 | 0 | 0 | 2 | |
| mtl_terrain | terrain entities | 100 | 200 | 200 | 0 | 0 | 2 | |
| mtl_model | model entities | 100 | 200 | 200 | 0 | 0 | 2 | |
| mtl_sprite | sprite entities | 50 | 100 | 100 | 0 | 0 | 2 | |
| mtl_metal | METAL entities | 100 | 100 | 100 | 255 | 0 | 10 | Metal checked in WED |
| mtl_unlit | UNLIT entities | 0 | 0 | 0 | 0 | 128 | 2 | Unlit checked in WED |
| mtl_sky | sky entities | 0 | 255 | 0 | 0 | 0 | 2 | |
| mtl_particle | particles, 3D lines | 0 | 0 | 0 | 0 | 128 | 2 | |
| mtl_shadow | shadows | 0 | 0 | 0 | 0 | 0 | 0 | for transparency and stencil blur effect |
vec_set(mtl_model.ambient_blue,vector(0,0,255));
// gives all models a reddish tint by reflecting only the red part of static lights
The mtlFX.c library in the code subfolder contains a library of predefined surface shaders. All shaders can be examined and edited in the Shader Viewer. For using a surface shader, include mtlFX.c in your main script, assign the shader action to the entity, and adjust the entity skills and material properties that serve as shader parameters.
Compared to external shaders, the library shaders are preferable because they are a) very fast, and b) work in a large range of situations. The following standard surface shaders and materials are available:
|
Action/Material
|
Shader |
Lights |
LM* |
NM* |
HM* |
SM* |
LOD* | Speed |
Adjustable Parameters
|
Remarks |
|---|---|---|---|---|---|---|---|---|---|---|
fx_bump mtl_bump |
Bump mapping (Lambert) |
3 |
yes |
yes |
- |
- |
- | Fast |
Ambient, Diffuse, Emissive |
Requires normal map on second skin. |
fx_specBump mtl_specBump |
Specular bump mapping (Blinn) |
3 |
yes |
yes |
- |
yes |
- | Fast |
Ambient, Diffuse, Specular, Power, Emissive |
Requires normal map on second skin. |
fx_parallax mtl_parallax |
Parallax mapping (Lambert) |
2 |
yes |
yes |
yes |
- |
- | Fast |
Ambient, Diffuse, Emissive |
Requires height map on normal alpha. |
fx_specParallax mtl_specParallax |
Parallax mapping (Phong) |
2 |
yes |
yes |
yes |
yes |
- | Fast |
Ambient, Diffuse, Specular, Power, Emissive |
Requires height map on normal alpha. |
fx_pom mtl_pom |
Occlusion mapping (Lambert) |
2 |
yes |
yes |
yes |
- |
- | Slow |
Ambient, Diffuse, Emissive |
Requires height map on normal alpha. |
fx_specPom mtl_specPom |
Occlusion mapping (Phong) |
2 |
yes |
yes |
yes |
yes |
- | Slow |
Ambient, Diffuse, Specular, Power, Emissive |
Requires height map on normal alpha. |
fx_toon mtl_toon |
Cartoon shading |
8 |
yes |
- |
- |
- |
- | Fast |
Ambient, Diffuse, Emissive, Shadow, Edgewidth, Threshold, Smooth |
|
fx_chrome mtl_chrome |
Chrome mapping |
1 |
- |
- |
- |
yes |
- | Fast |
Sun color, Entitity color, Scale, Ambient, Diffuse, Specular, Power, Emissive |
Uses reflection map chrome.dds |
fx_chromeBump mtl_chromeBump |
Chrome bump mapping |
1 |
yes |
yes |
- |
yes |
- | Fast |
Sun color, Entitity color, Scale, Ambient, Diffuse, Specular, Power, Emissive |
Uses reflection map chrome.dds |
fx_envGlass mtl_envGlass |
Environment glass mapping |
1 |
- |
- |
- |
- |
- | Fast |
Alpha, Albedo, Rainbow, Texture |
Uses level sky cube |
fx_envGlassBump mtl_envGlassBump |
Environment glass bump mapping |
1 |
- |
yes |
- |
- |
- | Fast |
Alpha, Albedo, Rainbow, Texture |
Uses level sky cube |
fx_envMap mtl_envMap |
Environment mapping |
8 |
- |
- |
- |
- |
- | Fast |
Ambient, Diffuse, Specular, Power, Emissive |
Fixed function effect; uses level sky cube |
fx_envBump mtl_envBump |
Environment bump mapping |
n/a |
- |
yes |
- |
yes |
- | Fast |
Sun color, Entitity color, Scale, Texture, Ambient, Diffuse, Emissive |
Uses level sky cube |
fx_terraintex mtl_terraintex |
Terrain multitexture effect |
8 |
yes |
- |
- |
- |
- | Fast |
Ambient, Diffuse, Specular, Power, Emissive |
Fixed function effect; tiled textures with mask on alpha (see below). |
fx_envWater mtl_envWater |
Water environment reflection |
1 |
- |
- |
- |
- |
- | Fast |
Sun color, Entitity color, Alpha, Albedo, xWind, yWind, Ripple, Scale |
Uses ripple texture water.dds and level sky cube |
fx_mirrorWater mtl_mirrorWater |
Water realtime reflection |
1 |
- |
- |
- |
- |
- | Slow |
Sun color, Entitity color, Alpha, xWind, yWind, Ripple, Scale |
Creates a mirror view; uses ripple texture water.dds. |
fx_mirrorFloor mtl_mirrorFloor |
Floor realtime reflection |
8 |
- |
- |
- |
- |
- | Slow |
Ambient, Diffuse, Specular, Albedo |
Creates a mirror view (see remarks). |
fx_uvspeed mtl_uvspeed |
Texture shifting |
8 |
yes |
- |
- |
- |
- | Fast |
Ambient, Diffuse, Specular, Power, Emissive, uSpeed, vSpeed |
No shader - just shifts u,v |
| fx_animTree mtl_animTree |
Tree/grass wind animation |
8 | - | - | - | - | 2 | Fast | x Wind, y Wind, Oscillation speed | Works for models and sprites |
fx_turbulence
mtl_turbulence |
Texture turbulence |
8 |
- |
- |
- |
- |
- | Fast |
Amplitude, Speed, Modulation |
A3/A4 style water surface wavering |
| mtl_twosided mtl_twosided_alpha |
Two-sided rendering |
8 | yes | - | - | - | Fast | Ambient, Diffuse, Specular, Power, Emissive | Draws also the backside of polygons |
|
| mtl_nomipmap | Suppressed Mipmaps |
8 | yes | - | - | - | Fast | Ambient, Diffuse, Specular, Power, Emissive | ||
| mtl_wireframe | Wireframe rendering |
8 | - | - | - | - | Fast | Ambient, Diffuse, Specular, Power, Emissive | ||
| mtl_lightcount | Display number of lights in range |
8 | - | - | - | - | Fast | - | Color coded light number for testing purposes (see below). |
|
| mtl_default | Dummy shader |
8 | yes | - | - | - | Fast | Ambient, Diffuse, Specular, Power, Emissive | Enforces default rendering |
The Lights column indicates the number of simultaneously supported lights per mesh, and the Lightmap column indicates whether the shader also supports lightmaps on the second skin of blocks, models, or terrain. All shaders require shader model 2.0. For details about the shaders please see the comments inside mtlFX.c.
*SM: Supports a specular map on the texture alpha channel. A specular map determines the 'shinyness' of the texture. On alpha = 100 the texture is shiny, on alpha = 0 the texture is matt. If the texture has no alpha channel, 100% shinyness is assumed.
*NM: Supports a normal map on the second or third skin, dependent on whether a lightmap is used. A normal map is a RGB texture that determines the three components of a local surface normal. It is usually generated by a special tool in a high polygon model editor, or converted from a height map.
*HM: Requires a depth map on the alpha channel of the normal map. A depth map determines a height modulation of the surface. On alpha = 100 the surface has a dent, on alpha = 0 it has a bump. The depth map uses the same coordinates as the normal map. Without it, the shader won't work.
*LM: Supports a lightmap either on the second skin of a block, or on the second coordinate set of a model, or assigned to entities' lightmap pointer. A lightmap is a RGB texture that determines local light and shadow modulation of the surface, and uses normally a different resolution and UV coordinate set than the texture. If the object has no lightmap, a 100% white light modulation is assumed. Shaders that support lightmaps can be assigned to models as well as to level geometry.
*LOD: Shader disabled above the given LOD step, for speed reasons.
For adding a shader to an entity action in a lite-C script, set the 4 shader variables (if applicable) and the material at the beginning of the entity action:
#include <mtlFX.c>
...
action toon_warrior()
{
  my.skill41 = floatv(50);  // Shadow
  my.skill42 = floatv(50);  // Edgewidth
  my.skill43 = floatv(50);  // Threshold
  my.skill44 = floatv(50);  // Smooth
  my.material = mtl_toon;
  ...
}
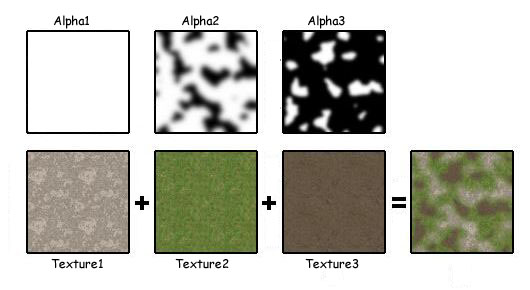
The game editor GED automatically creates and assigns the textures when you directly paint onto the terrain. If you've created them in a different program, open the terrain in MED and assign texture1 to the first skin, texture2 to the second, and so on. Every texture requires a separate render pass, thus don't use too many of them. When 3 or more textures are assigned to a terrain, MED Engine Preview automatically displays the terrain with the mtl_terraintex shader.
For temporarily replacing any of the predefined shaders by the light count shader, copy mtlFX.c in your work folder, edit the material definition and temporarily replace the original effect = "....fx"; line by effect = "lightcount.fx";.