Because we're processing the screen buffer, we need a second view for postprocessing. The shader material is now applied not to the entity but to the view, indicating that we're going to apply the shader to the whole view. Have a look in our script:
Shaders can not only be used for rendering objects on the screen. They can also be applied to the pixels of an already-rendered scene. This is often used for blurring, sharpening, distorting or otherwise affecting the content of the screen buffer. The term postprocessing is used for such effects because the shader processes the screen buffer after the rendering.
A screen buffer does not contain any vertices, but only pixels. So we only have a pixel shader this time, and also the variables to use are greatly restricted. Here's a basic postprocessing shader that creates an 'emboss' effect:
// Tweakables:
float fContrast = 1.5;

//Application fed data:
float4 vecViewPort;
texture TargetMap;
sampler TargetSampler = sampler_state { texture = <TargetMap>; };

// Pixel Shader:
float4 postprocessing_emboss( float2 Tex : TEXCOORD0 ) : COLOR0
{
   float4 Color = float4(0.5, 0.5, 0.5, 1.0); // medium grey
   if (Tex.y < 0.5) {  // postprocess only the lower half of the image
	   Color = tex2D( TargetSampler, Tex.xy);
	 } else {
	   Color -= tex2D( TargetSampler, Tex.xy-vecViewPort.zw)*fContrast;
	   Color += tex2D( TargetSampler, Tex.xy+vecViewPort.zw)*fContrast;
	   Color.rgb = (Color.r+Color.g+Color.b)*0.33; // make monochrome
   }
	 return Color;
}

technique Emboss
{
	pass p1
	{
		Lighting = False;
		PixelShader = compile ps_2_0 postprocessing_emboss();
	}
}
Rather than an entity skin, we're now using the TargetMap for our texture sampler. TargetMap is set by the engine to the last render target - the buffer the scene was rendered into. This buffer looks like a normal texture to our shader.
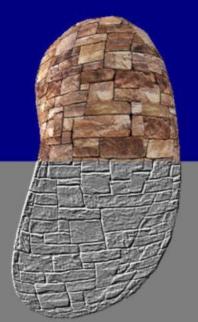
The only parameters to the pixel shader are the texture coordinates that run from 0 to 1 from the upper left corner of the screen to the lower right one. What we want to do is an emboss effect that lets the screen content look like 'embossed' into the window.
float4 postprocessing_emboss( float2 Tex : TEXCOORD0 ) : COLOR0
{
   float4 Color = float4(0.5, 0.5, 0.5, 1.0); // medium grey
   if (Tex.y < 0.5) {  // postprocess only the lower half of the image
	   Color = tex2D( TargetSampler, Tex.xy);
	 } else {
	   Color -= tex2D( TargetSampler, Tex.xy-vecViewPort.zw)*fContrast;
	   Color += tex2D( TargetSampler, Tex.xy+vecViewPort.zw)*fContrast;
	   Color.rgb = (Color.r+Color.g+Color.b)*0.33; // make it monochrome
   }
	 return Color;
}
First we determine trough the Tex.y coordinate value whether we're rendering the upper or lower half of the image. In the upper half we're just rendering the texture. In the lower half we apply our emboss effect. We begin with a medium grey pixel and then add the difference between its upper left neighbor pixel and its lower right neighbor pixel. If the pixel value increases, the emboss pixel gets brighter; if it decreases the emboss pixel gets darker. For determining the neighbor pixels, we add or subtract one pixel width to the Tex.x and Tex.y coordinates. The horizontal and vertical pixel width of the render target is contained in the vecViewPort.z and vecViewPort.w values.
Finally we calculate the average value of the red, green, and blue component and put it into all 3 color channels for decolorizing the emboss pixel.
The demo to run is embossdemo.c:
Because we're processing the screen buffer, we need a second view for postprocessing. The shader material is now applied not to the entity but to the view, indicating that we're going to apply the shader to the whole view. Have a look in our script:
MATERIAL* mtlEmboss =
{
	effect = "pp_emboss.fx"; // effect file containing the postprocessing shader.
	flags = AUTORELOAD;	     // allows to edit the shader at runtime
}

VIEW* viewEmboss =
{
	material = mtlEmboss;	// use the emboss shader
	flags = PROCESS_TARGET; // process the previous view's render target
}

function main()
{
// load an empty level, and create a model
	level_load("");
	ENTITY* ent = ent_create("blob.mdl",vector(50,0,0),NULL);

// connect the default camera view to a postprocessing view
	camera.stage = viewEmboss;

	while(1)
	{
		sun_angle.pan += 1.25 * time_step;
		ent.pan -= 2.25 * time_step;
		ent.tilt -= 1.1 * time_step;
		wait(1);
	}
}
We have defined a new view named viewEmboss and assigned our postprocessing material mtlEmboss to it. The view got the PROCESS_TARGET flag, indicating that it does not render a scene but processes a render target. By connecting our view to the default camera view through the stage parameter, the camera view now renders not on the screen but into a temporary buffer. This buffer is the TargetMap that we've used in our shader.
By using postprocessing we can not only apply some strange effects to an already-rendered scene. We can also use the postprocessed scene as an input for further rendering. We will learn more about such advanced shader techniques in the next workshop.