Previous: Bones
If you have done your homework at the end of the animation workshop, you know already how to let an entity walk. In this workshop we'll put all our knowledge together to create a basic third person shooter game, with a player, an enemy, and a third person camera. Therefore this workshop is a little longer, in fact it's a major milestone in game development! Please note that A7 version 7.82 or above is required - it won't work with older versions.
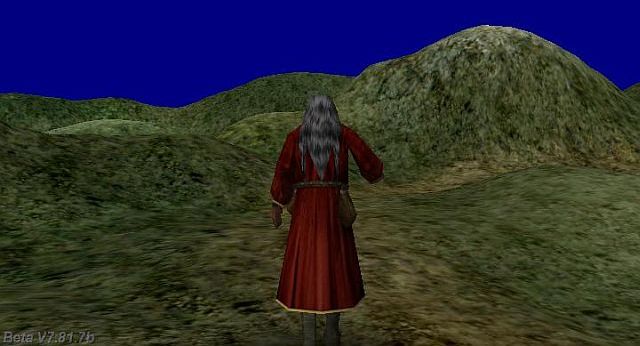
Open shooter.c in workshop24, run it, and use the arrow keys to walk (or rather, limp) the red wizard around:
We have three entity actions in the script, so let's break it down. At first only look at the wizard_walk action, somewhere in the middle of the script:
action wizard_walk()
{
  camera_follow(me);

  VECTOR vFeet;
  vec_for_min(vFeet,me); // vFeet.z = distance from player origin to lowest vertex

  my.STATE = 1;
  while (1)
  {
// state 1: walking ////////////////////////////////////////////
    if (my.STATE == 1)
    {
// rotate the entity with the arrow keys
      my.pan += (key_cul-key_cur)*5*time_step;

// move the entity forward/backward with the arrow keys
      var distance = (key_cuu-key_cud)*5*time_step;
      c_move(me, vector(distance,0,0), NULL, GLIDE);

// animate the entity
      my.ANIMATION += 2*distance;
      ent_animate(me,"walk",my.ANIMATION,ANM_CYCLE);

// adjust entity to the ground height, using a downwards trace
      c_trace(my.x,vector(my.x,my.y,my.z-1000),IGNORE_ME | IGNORE_PASSABLE);
      my.z = hit.z - vFeet.z; // always place player's feet on the ground

      if (key_space) { // key pressed -> go to state 2
        my.ANIMATION = 0;
        my.STATE = 2;
      }
    }

// state 2: casting a spell ///////////////////////////////////
    if (my.STATE == 2)
    {
      my.ANIMATION += 8*time_step;
      ent_animate(me,"attack",my.ANIMATION,0);

      if (my.ANIMATION > 100) { // create the spell and go to state 3
        ent_create("spell.dds",vector(my.x,my.y,my.z+20),spell_fly);
        my.ANIMATION = 0;
        my.STATE = 3;
      }
    }

// state 3: waiting for key release ///////////////////////////
    if (my.STATE == 3) {
      if (!key_space) my.STATE = 1; // when key was released, back to state 1
    }

    wait(1);
  }
}
A the beginning we're calling camera_follow for letting the camera look over the shoulder of the player - we'll come to that later. Then we're doing some initialization stuff.
VECTOR vFeet;
vec_for_min(vFeet,me);
We already know a VECTOR from previous workshops. We use the vFeet vector for getting the position of the player's feet: we have to place them on the ground while he's walking. vec_for_min sets the vFeet vector to minimum coordinates of the model's mesh. As the feet are usually the lowest part of the body, the vFeet.z value now contains the position of the feet - or more accurately, the sole - in relation to the model's origin position. For instance, when the player is 100 units tall and its origin - the 0,0,0 point of its coordiante system - is precisely at its center, vFeet.z will contain the value -50 because the feet are 50 units below the origin.
You've noticed that we've defined the vector directly inside the function - it's local. We might have many different actors with the same action, so local variables are needed for storing their coordinates.
Now what for are we using the following line?
my.STATE = 1;
What is my.STATE? An entity parameter STATE is nowhere listed in the manual! But we've defined it ourselves - look at the beginning of the script:
#define STATE skill1
#define ANIMATION skill2
This lets us address the general purpose entity variable skill1 under the name "STATE", and skill2 under the name "ANIMATION". The same way we can rename any other of an entity's 100 skill variables to HEALTH, STRENGTH or the like, just to make more clear what we're using it for. We're using an entity skill rather than a local variable because we want it to be accessible by other functions. Believe it or not, the unsuspicious my.STATE variable is the core of the actor's artificial intelligence in almost all computer games!
The term Artificial Intelligence (known simply as "AI") was first defined by Patrick H Winston in his book "Artificial Intelligence" as: "the computations that make it possible to perceive, reason, and act." The academic study of Artificial Intelligence is fascinating, but game programmers tend to be more interested in results. Therefore, we'll leave the debate on whether a machine can actually posses intelligence to the Behaviourists, Mechanists, and Dualists, and concern ourselves with writing code to make our entities "perceive, reason, and act" within our game world.
A popular technique for modelling AI, and the one used in most games, is known as a state machine. Looking at structure of a state machine, shown graphically in the diagram below, we can see that it is nothing more than a series of states (represented by the spheres) connected by a series of transitions (represented by the arrows). Each entity starts in a certain state and, depending on the input it receives, it will transition from its current state to another state in the machine. For instance, an opponent in a shooter game could have the following behavioral states: Waiting, Attacking, Escaping, Dying, and Dead.
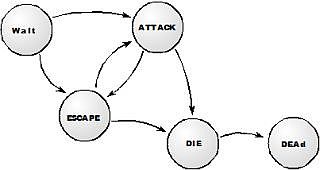
Such transitions may be triggered by events such as collisions or hitting keys or buttons. When designing an entity action, it makes a lot of sense to first draw a state diagram as above, and then program and test the different states separately. Looking at the main while() loop of our wizard action above, we can identify three different states and its transitions. The if(...) statements take care that depending on the my.STATE variable, different parts of the loop are executed:
| Initialize the entity settings. | |
State 1: Walk |
Turn and walk, controlled by the arrow keys. |
| [Space] pressed => go to state 2. | |
State 2: Attack |
Go through the spell casting animation. At the end, create the spell. |
| Animation finished => go to state 3. | |
State 3: Wait |
Do nothing while the key is still pressed. |
| [Space] released => go back to state 1. |
The single wait(1) statement at the end of the loop is executed every time, by any state. Thus we don't need to put individual wait calls into the states.
Now let's have a closer look into the separate states. We begin with the walking state 1.
if (my.STATE == 1)
{
my.pan += (key_cul-key_cur)*5*time_step;
var distance = (key_cuu-key_cud)*5*time_step;
c_move(me, vector(distance,0,0), NULL, GLIDE);
The right and left arrow keys decrease or increase the player's pan value, which rotates the player right and left. The up and down arrow keys are used to calculate a forward distance stored in the distance variable. That's also a directly defined local variable, just like our vFeet vector. It's very convenient that you can define local variables in a function right at the place where you use them.
We're using the distance variable to move the player ahead, and also for animating the player according to its walked distance:
my.ANIMATION += 2*distance;
ent_animate(me,"walk",my.ANIMATION,ANM_CYCLE);
ANIMATION is another one of the general purpose entity skills that we named at the beginning of the script, just like STATE. We use it as a percent value for animation. When increasing the animation percentage by the walk distance, the entity animates accordingly to its walking speed. The factor 2 can be adjusted to fit to other models that cover a larger or smaller distance per walk animation cycle.
c_trace(my.x,vector(my.x,my.y,my.z-1000),IGNORE_ME | IGNORE_PASSABLE);
my.z = hit.z - vFeet.z;
These two lines are for adjusting the player to the height of the terrain. c_trace is like a laser distance sensor: it casts a ray between two positions and determines the hit point where the ray hits an obstacle. In our case, we're casting a ray downwards from the player position vector - given by my.x which serves as the vector (my.x,my.y,my.z) - to a position 1000 units below - given by vector(my.x,my.y,my.z-1000). The ray hits the ground of the terrain, and the hit position is stored in the (hit.x,hit.y,hit.z) vector. We add the relative position of the player's feet (vFeet.z) and get the height we have to place the player at (my.z).
An example: when vFeet.z is -50 and hit.z is 100, we have to place the player vertically at 100 - (-50) = 150, i.e. 50 units above the ground.
Why do we need to set the player's height at all, as the c_move collision detection would prevent anyway that he sinks into the ground? That's right, but it would come at a cost. Every collision consumes valuable processor time. Dragging a player over the ground with permanent collisions would have a bad impact on the frame rate when we do that simultaneously with 1000 players and enemies in a game. Therefore, we're keeping his collision box at a safe height for avoiding any collisions when walking normally.

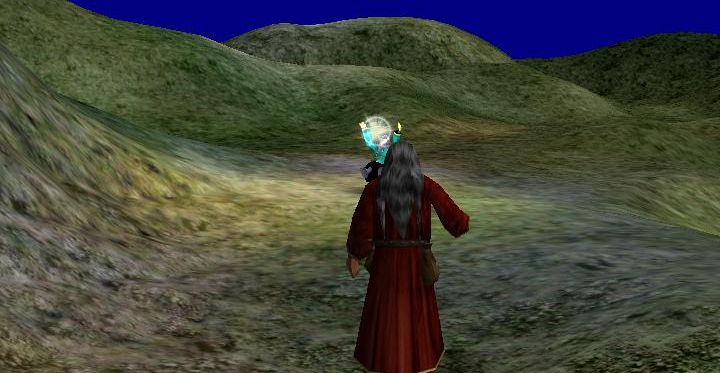
A collision box is the hull around a moving object that determines its range of collision detection. It's used by c_move to calculate whether the player collides with something or not. In reality it's not a box but an ellipsoid, but this shall not bother us here. Press [F11] twice to make the player's collision box visible - it's the bright blue wire box in the screenshot above.
The default 'narrow' box has a size of 32x32x32 quants and is assigned to all medium sized models at game start. You can see that it's centered around the player's waist. It's normally smaller than the model's real size for allowing all players to fit through the same doors and get close to walls. And it has some distance to the ground for allowing the player to walk without colliding all the time. Of course, we can set up the collision box in a different way, and give it the real entity size - we'll do that soon below.
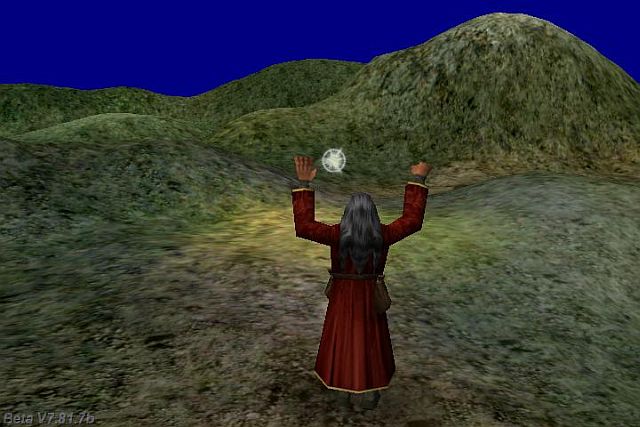
Next, we look into attack mode, states 2 and 3. Press the [Space] key and watch what happens:
if (key_space) {
my.ANIMATION = 0;
my.STATE = 2;
}
The key kicks the entity out of state 1 and right into state 2 that starts with a spell casting animation.
if (my.STATE == 2)
{
my.ANIMATION += 8*time_step;
ent_animate(me,"attack",my.ANIMATION,0);
if (my.ANIMATION > 100) {
ent_create("spell.dds",vector(my.x,my.y,my.z+20),spell_fly);
my.ANIMATION = 0;
my.STATE = 3;
}
}
As soon as the animation is finished (> 100%), the spell entity is created and the wizard goes to state 3. This last state just waits until the player has released the [Space] key. Otherwise the wizard would fire spells like a machine gun.
if (my.STATE == 3) {
if (!key_space) my.STATE = 1;
}
When the [Space] key is not pressed anymore, the wizard goes back to state 1. The '!' is the "not" operation in a programming language and just inverts the following value.
I have not much experience with spells - that's why I assumed that a spell is a sort of flying fireball. If I'm wrong here, and some real wizard reads this, please correct me! The spell created in state 2 is a sprite entity - you learned about sprites in a previous workshop - and, you guessed it, it's a state machine too.
action spell_fly()
{
  my.ambient = 50;  // medium bright
  my.lightrange = 300; // activate dynamic light
  vec_set(my.blue,vector(255,50,50)); // bluish light color
  set(me,BRIGHT);   // additive blending

  vec_scale(my.scale_x,0.15); // small size
  c_setminmax(me);   // set my bounding box to my real size
  my.pan = your.pan; // face same direction as player
  my.STATE = 1;

  while(1)
  {
// state 1: flying ///////////////////////////////////////////
    if (my.STATE == 1)
    {
      my.roll += 20*time_step;
      c_move(me,vector(40*time_step,0,0),NULL,IGNORE_YOU);
      if (HIT_TARGET)  // collided?
        my.STATE = 2;  // go to state 2
    }

// state 2: exploding ////////////////////////////////////////
    if (my.STATE == 2)
    {
      set(me,ZNEAR);  // appear in front of close objects
      my.roll = random(360);
      my.lightrange *= 1+0.5*time_step; // increase light range
      vec_scale(my.scale_x,1+0.5*time_step); // inflate size
      if (my.scale_x > 1) { // explosion finished?
        ent_remove(me);
        return; // terminate function to prevent furter access to removed entity
      }
    }

    wait(1);
  }
}
And that's our state table - a little less complicated than the wizard's:
| Initialize the entity settings. | |
State 1: Fly |
Fly ahead in the direction the spell caster was looking, and rotate. |
| Collision with an obstacle => go to state 2. | |
State 2: Explode |
Grow bigger fast, and increase the light range. |
| Final size reached => remove entity. |
The first lines in the action are just for show - they set up the brightness and dynamic light:
action spell_fly()
{
my.ambient = 50;
my.lightrange = 300;
vec_set(my.blue,vector(255,50,50));
set(me,BRIGHT);
The next lines are important. Without them, the spell wouldn't correctly fly at all!
vec_scale(my.scale_x,0.15);
c_setminmax(me);
my.pan = your.pan;
my.STATE = 1;
We're using the vec_scale function to multiply the original entity scale with 0.15, which gives it just the size of a small spell. The following c_setminmax call sets the entities' collision box to this reduced size. Without c_setminmax the entity would also get a default box size, just like the bright blue box that you've seen in the screenshot above. It's too big for the scaled-down spell and would let it collide too early with the terrain while moving.
Moving happens in state 1:
if (my.STATE == 1)
{
my.roll += 20*time_step;
c_move(me,vector(40*time_step,0,0),NULL,IGNORE_YOU);
if (HIT_TARGET)
my.STATE = 2;
}
The roll angle is increased for rotating the sprite, then it's moved ahead. IGNORE_YOU prevents the sprite from colliding with its creator, the red wizard, which is set to the you entity pointer at the action start of its created entities. Be aware that the you pointer is also changed by many other engine functions, so in a more complicated action you normally need to store it in a local variable or an entity skill. After a c_move call, the HIT_TARGET macro evaluates to nonzero when the entity collided with something. That triggers the next state:
if (my.STATE == 2)
{
set(me,ZNEAR);
my.roll = random(360);
my.lightrange *= 1+0.5*time_step;
vec_scale(my.scale_x,1+0.5*time_step);
if (my.scale_x > 1)
ent_remove(me);
return;
}
}
The explosion is nothing fancy - we just fast increase the entity size and lightrange. The ZNEAR flag of a sprite causes it to be rendered above close objects. Otherwise the sprite explosion would be partially covered and look less realistic. The roll angle is set each frame to a random value between 0 and 360 degrees, in order to give the sprite a flickering effect. Once the original size is reached, the sprite is removed and the function terminated. If we would not return from the function here, it would crash in the next while loop due to accessing a nonexistent entity.
We're not yet finished with this workshop. Let the wizard limp along the path to the left. Soon he'll encounter a collegue:

Now, we must know that green wizards are the arch foes of red wizards. So we're going to cast our spell on him!
Gotcha! If you aimed well, the spell hits the green wizard right in the chest and knocks him unconscious (if not worse). Let's look into the simple code that's doing that.
function wizard_hit()
{
  my.STATE = 2;
}


action wizard_stand()
{
  my.event = wizard_hit;
  my.emask |= ENABLE_IMPACT;
  my.STATE = 1;
  while (1)
  {
// state 1: do absolutely nothing //////////////////////////////

// state 2: death animation ////////////////////////////////////
    if(my.STATE == 2)
    {
      my.ANIMATION += 3*time_step;
      ent_animate(me,"death",my.ANIMATION,0); // animate the entity
      if (my.ANIMATION > 70)
        return;
    }

    wait(1);
  }
}
We've already learned in a previous workshop about mouse events; here we've set up a collision event. We remember that we need two things: an event function - wizard_hit - that is set to the entity's event parameter, and an enable flag that is set to the entity's emask parameter (the '|=' operator sets a flag). The ENABLE_IMPACT flag starts the event function when another entity - in this case, the spell - hits this entity. There are many other enable flags that start event functions when the entity itself collides with something, or is shot at, or is detected, or something explodes close by, or similar. Here, the event function just sets the STATE to 2 and initiates the wizard's death animation. The state 1 in the while loop is nonexistent because it doesn't do anything besides waiting.
By the way, that's why we used an entity skill for STATE rather than a local variable: this way it can be accessed by other functions, like the event function here.
The last piece of code is the shortest one. Let's pretend that you had not yet enough of mathematics, and look into the camera_follow function:
function camera_follow(ENTITY* ent)
{
while(1)
{
vec_set(camera.x,vector(-150,10,25));
vec_rotate(camera.x,ent.pan);
vec_add(camera.x,ent.x);
vec_set(camera.pan,vector(ent.pan,-10,0));
wait(1);
}
}
This is the most basic third person camera. The function gets the entity pointer to follow as an argument, and calculates from it the camera position so that it's always behind the entity. For understanding it, let's calculate an example.
Assume the entity is standing at position (100,200,300) and facing north (pan = 90°). We first set the camera position relative to the player at (-150,10,20) - that's 150 units behind him, slightly to the right and upwards, so that the camera looks over its right shoulder.
Camera position: (-150,10,20)
When the player rotates, the camera position should swing around him - so we're using the vec_rotate function to rotate the camera by the player angle. The angle is 90 degrees in our calculation example, so the position rotates 90 degrees counterclockwise around the coordinate origin. You can draw a diagram to see the new x and y values:
Camera position: (-10,-150,20)
Next, we add the player position (100,200,300) through vec_add for determining the real camera position not relative to the player, but in world coordinates. We get:
Camera position: (90,50,320)
The camera is now south of the player, and slightly to the right and upwards, just as we need it. Finally, we let the camera likewise look north by setting its pan angle to the player angle, but its tilt to -10 so that it looks slightly down. When you're interested, you can find a more detailed introduction into vector mathematics in the Vectors chapter of the manual.
Homework: Modify the code to make it a fair duel. The green wizard should detect when the red one comes close to him, or when a spell is cast, and then fight back with spells. You can use all the engine commands that you find in the manual - for instance, c_scan is great for detecting entities in the proximity. You'll find the solution in shooter_2.c.