Previous: Global Variables. Local Variables
Advanced model animation. Bones.
From the previous workshops you've learned that models can be animated using frames. So all you need to do is to create frames for standing, walking, running, shooting, jumping, ducking, dieing, and so on. But what do you do if you want to be able to run AND shoot at the same time? Well, you can create another animation that does both these things and name it "runshot" or something like this. Or, you could use bones animation and use any combination of the existing animations using only lite-C code, like walking + looking up at the same time, or maybe crouching + shooting at the same time or... well, I think I've made my point.
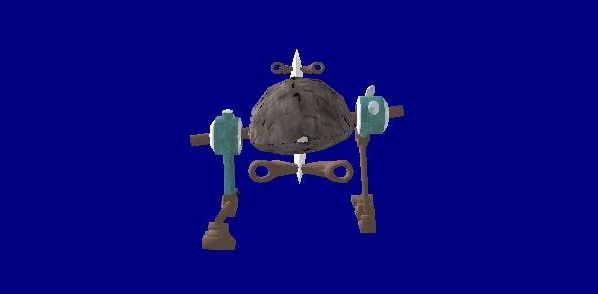
Start SED, open workshop23 and run script23.c. You'll see a strange creature like on the image below:
You will notice that this robot is (obviously) "programmer's art". The robot is playing its "walk" animation in a while loop; don't forget that you can press the [0] (zero) key anytime if you want to move and rotate the camera using the arrow keys, [Home], [End], [PgUp], [PgDn], [<] and [>]. Now press and hold the [Space] key for a while:
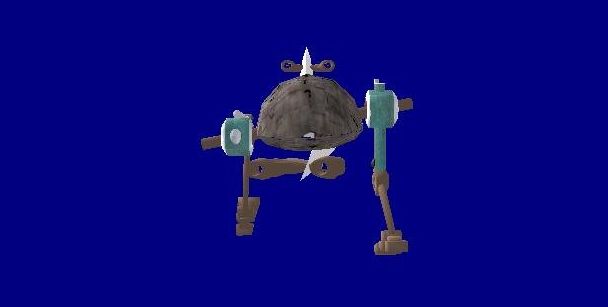
The robot has rotated its weapons toward the left side of the screen. Release [Space] and the weapons will return to their original position. When you open the robot.mdl in MED and run its animation, you'll notice that the 2 animations ("walk" and "turn") are two different animation scenes, and yet our script file has blended them together nicely. The robot can walk and rotate its weapons at the same time, even though we didn't use a special "walkturn" animation!
The script file is small enough - see for yourself:
function bones_test()
{
  my.pan = -150; // face the player
  var walk_speed = 0;
  var turn_speed = 0;
  while(1)
  {
    ent_animate(my, NULL, 0, 0); // reset all the animations
    walk_speed += 1.5 * time_step; // increase walk_speed; 1.5 sets the speed
    ent_animate(my, "walk", walk_speed, ANM_CYCLE); // animate the model (use "walk")
    if (key_space && (turn_speed < 100)) // space was pressed?
      turn_speed += 10 * time_step; // then increase turn_speed
    if (!key_space && (turn_speed > 0)) // space isn't pressed?
      turn_speed -= 10 * time_step; // then decrease turn_speed
    if (turn_speed > 0) // got to turn?
      ent_animate(my, "turn", turn_speed, ANM_ADD); // animate the model (use "turn")
    wait(1);
  }
}

function main()
{
   level_load ("");	// load an empty level
	// and then now create the robot model at x = 400, y = 0, z = -50 quants
   ent_create("robot.mdl", vector(400, 0, -50), bones_test);
}
Function main loads an empty level, waits until it is loaded, and then creates a robot model, placing it at a specified position in the level and attaching it the function named bones_test. This function subtracts 180 degrees from robot's pan angle, making it face the camera, and then runs a while (1) loop. Let's examine its content thoroughly:
while(1)
{
ent_animate(my, NULL, 0, 0);
walk_speed += 1.5 * time_step;
ent_animate(my, "walk", walk_speed, ANM_CYCLE);
We have discussed about ent_animate in our previous workshop; the first line of code inside the "while" loop resets all the bones for our model, restoring their original positions. There isn't anything magical with that line of code: setting the animation name to NULL does the job always, IF your model uses bones. Don't forget to read the MED section in the Game Design Tutorial if you want to learn more about models and bone creation. We have defined a local variable named "walk_speed" which contains the walking animation percentage; play with 1.5 if you want to alter the "walk" animation speed.
The following line of code animates the robot using its "walk" animation, as discussed in our previous workshop. Ok, let's see that ent_animate definition once again; we will need it as a reference anyway:
ent_animate (entity_name, animation_name, animation_percentage, animation_mode);
There's nothing unusual with our "ent_animate" line of code: it animates our model using its "walk" animation, with the speed given by "walk_speed" and loops the animation because of the "ANM_CYCLE" parameter. Let's discuss the next few lines of code from our action:
if (key_space && (turn_speed < 100))
turn_speed += 10 * time_step;
if (!key_space && (turn_speed > 0))
turn_speed -= 10 * time_step;
The lines above check if we have pressed the [Space] key or not. If we have pressed it and turn_speed has a value below 100, its value will increase with the speed given by "10 * time_step"; otherwise, if [Space] isn't pressed and turn_speed is bigger than zero, its value will be decreased with the speed given by "10 * time_step". So these four lines of code set the variable named turn_speed to a value that can grow from 0 to 100 if we press and hold "Space", and decrease turn_speed slowly if we release [Space]. Here's a picture that shows what's happening more clearly:
The player waits (in this example) for 1 second, and then presses the [Space] key; "turn_speed" starts growing by adding "10 * time_step" to its initial value every frame, and stops when it reaches 100, even if the player continues to keep [Space] pressed. Five seconds have passed and the player decides to release [Space]; now "turn_speed" starts decreasing its value by "10 * time_step" each frame, until it reaches zero.
ent_animate(my, "turn", turn_speed, ANM_ADD);
wait(1);
}
The last part of the loop "ent_animates" the model using its "turn" animation and the "ANM_ADD" mode. This animation mode can't be used for vertex animations, so I chose not to mention it in our previous workshop: it adds the new bone angles to the old ones, rather than completely replacing the older bone angles. This means that the model will keep walking even if we press the [Space] key in order to use the "turn" animation as well.
Let's review the full loop again (briefly):
while(1)
{
ent_animate(my, NULL, 0, 0);
walk_speed += 1.5 * time_step;
ent_animate(my, "walk", walk_speed, ANM_CYCLE);
if (key_space&& (turn_speed < 100))
turn_speed += 10 * time_step;
if (!key_space && (turn_speed > 0))
turn_speed -= 10 * time_step;
ent_animate(my, "turn", turn_speed, ANM_ADD);
wait(1);
}
There are 3 ent_animate instructions in this action:
- The first one resets the animations (the bone positions) every frame. Just make sure to use this at the beginning of the loop;
- The second instruction animates the robot using its "walk" animation;
- The third instruction plays the "turn" animation by adding the new angle of the gun turret bone to the old angles.
The rest of the code should be really easy to understand.
Yes, this workshop was written for you, the bone collector. You aren't a regular person; you want to become a master in Lite-C programming, so you want to know even more about bone animations. We will now discuss about "ent_bonerotate" and "pose" - these are two important features when it comes to bones.
Start SED and open the script23_2.c file:
BMAP* crosshair_pcx = "crosshair.pcx"; // the bitmap used for our crosshair

////////////////////////////////////////////////////////////////////////////////////

function rotate_bone()
{
   my.pan = -180; // face the camera
   var walk_speed = 0; // stores robot's walking animation
   ANGLE bone_angle; // a vector that holds the pan, tilt and roll angles
   while(1)
   {
     walk_speed += 2 * time_step; // increase walk_speed, "2" sets the animation speed
     ent_animate(my, "walk", walk_speed, ANM_CYCLE); // animate the model (use "walk")
     bone_angle.pan = (mouse_pos.x - screen_size.x / 2) / 10; // changes pan from -40 to +40 degrees
     bone_angle.tilt = (screen_size.y / 2 - mouse_pos.y) / 10; // changes tilt from -30 to +30 degrees
     bone_angle.roll = 0; // no need to change the roll angle for this bone
     ent_bonereset(my,"CA4");
     ent_bonerotate(my,"CA4", bone_angle); // rotate the bone named "CA4"
     wait(1);
   }
}

function main()
{
   level_load (""); // load an empty level
   ent_create("robot.mdl", vector(400, 0, -50), rotate_bone); // and then create the robot model
   mouse_map = crosshair_pcx; // set the bitmap that is going to be used by the mouse pointer
   mouse_mode = 4; // activate mouse
}
Function main() loads an empty level, creates the robot model, sets the
bitmap for the mouse pointer to crosshair_pcx and then makes the cursor visible. The "while (1)"
loopupdates the position of the pointer every frame. If you have studied the
14th workshop you know how the mouse works.
Let's examine the new bone function:
while(1)
{
walk_speed += 2 *
time_step;
ent_animate(my, "walk", walk_speed,
ANM_CYCLE);
bone_angle.pan = (mouse_pos.x -
screen_size.x/2) / 10;
bone_angle.tilt = (screen_size.y/2 -
mouse_pos.y) / 10;
bone_angle.roll = 0;
ent_bonereset(my,"CA4");
ent_bonerotate(my,"CA4",
bone_angle);
wait(1);
}
The code begins just like in the previous workshop; we make the robot face the camera and then we play its "walk" animation. We don't need to reset the bones this time because we don't have an ANM_ADD, but an ANM_CYCLE animation mode. The following 3 lines compute the needed angles using the position of the mouse:
bone_angle.pan = (mouse_pos.x -
screen_size.x / 2) / 10;
bone_angle.tilt = (screen_size.y / 2 -
mouse_pos.y) / 10;
bone_angle.roll = 0;
We have defined an ANGLE vector named bone_angle. An ANGLE is just like a normal vector, but its 3 components are named pan, tilt, roll rather than x, y, z. Let's see how they are computed.
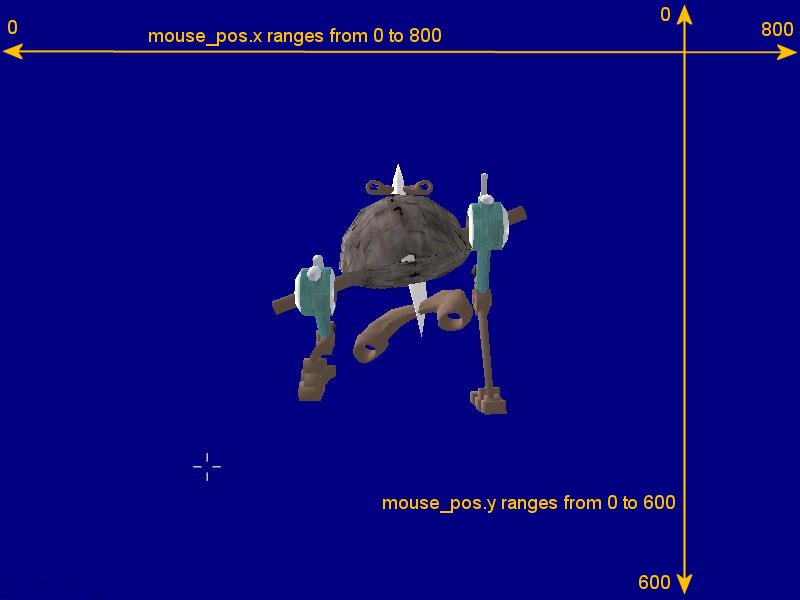
We have set the video resolution for this demo to 800 x 600 pixels, so the mouse pointer x position (mouse_pos.x) can have a value between 0 pixels (the left side of the screen) and 800 pixels (the right side of the screen). Our formula subtracts half the horizontal screen size (400) from mouse_pos.x, setting a value that can range from -400 to 400, and then it divides the result by 10. This means that our bone_angle can change its pan angle from (-400... +400) / 10 = (-40... +40) degrees if we move the mouse along the x axis of the screen.
The formula that computes the tilt angle is a bit different because the y coordinate is reverted (see the picture above). We must subtract mouse_pos.y from half the vertical screen size in order to get a value that ranges from -300 (bottom of the screen) to +300 (top of the screen). The result is divided by 10, so the tilt angle will range from -30 to +30 degrees if the player moves the mouse along the y axis.
I chose to limit pan to -40...+40 degrees and tilt to -30... +30 degrees for the two angles, but you can set any other ranges by playing with "10". Aren't you curious to see the robot in action? Run the script file and you will see it following the position of the mouse pointer with its guns.
Now that we have computed the needed pan and tilt angles, we can use them to rotate the gun turret:
ent_bonereset(my,"CA4");
ent_bonerotate(my,"CA4",
bone_angle);
The first line resets the gun bone, who was named "CA4" in MED, to its default orientation and angle in relation to its parent bone. The next line rotates the bone using our previously computer pan and tile angles, which were stored inside bone_angle. Here's the default position of the "CA4" bone for our robot.mdl in MED:
Let's take a look at the general form of the instruction:
ent_bonerotate(entity_name, bone_name, rotation_angle);
- "entity_name" is the name of the entity;
- "bone_name" is the name of the bone that will be rotated;
- "rotation_angle" is a vector that contains the pan, tilt and roll angles.
Why do we need to reset the bone first? Let's assume that bone_angle.pan is set to 30 degrees at a certain moment. Then, let's imagine that the player moves the mouse a little further in the following frame, until bone_angle.pan reaches 35 degrees. But the gun was already rotated by 30 degrees in the previous frame, so it would now rotate another 35 degrees, setting the pan angle to 30 + 35 = 65 degrees!
This is what would happen if we wouldn't use that "ent_bonereset" instruction inside the while loop. By using ent_bonereset we discard the old angles every frame, so the bone will only get the newly computed angles (pan = 35 degrees in my previous example). Well, we don't really need ent_bonereset here, because the "walk" animation resets the gun bone already; however, this might not be the case when you use other entities with different animations!
Now that you know how to work with ent_bonerotate, I am sure that you will find it to be extremely useful for your projects: your enemies will know how to point their guns at you, your ninja warriors will move and rotate their bodies when they are hit, and so on. I'd buy myself a Kevlar vest if I would be in your shoes...