Workshop 06: Buttons and sliders
Buttons
A button is another panel element that can be clicked. Come on, you are clicking hundreds of buttons every day, you know what they are! Let's see a typical button definition:
button (x, y, bitmap_normal, bitmap_released, bitmap_over, function_clicked, function_released, function_over);
That's a long definition! Let's discuss every term using pictures:
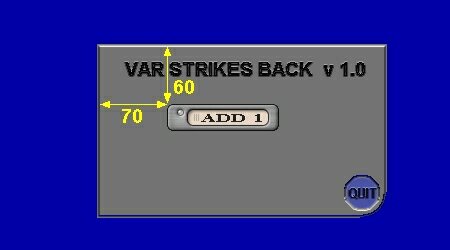
- x and y give the position of the button on the panel. You can see that x = 70 and y = 60 in the picture below. These coordinates work for buttons the same way they work for digits and windows, but have one additional requirement: For catching mouse clicks, the button must be completely inside the panel area, which is normally given by the panel's bmap image.
- bitmap_clicked is the bitmap that appears on the button when you click it using the left mouse button. By the way, the green smiley is my mouse pointer;

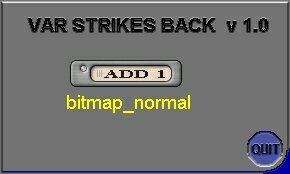
- bitmap_normal is the bitmap that appears on the button at game start, without clicking it;
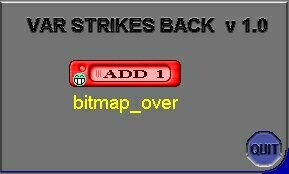
- bitmap_over is the bitmap that appears on the button if you move the mouse over it, without clicking it;
- function_clicked is the name of a function that will be executed when we click the button;
- function_released is the name of a function that will be executed when the mouse leaves the button, or when we release the left mouse button over the button;
- function_over is the name of a function that will be executed when the mouse pointer is placed over the button, without clicking it.
(Tip: don’t use parenthesis at the end of the button functions. If you add a pair of parenthesis, you tell the engine to call (to run) those functions right away and you don’t want to do that; the functions should run only when the buttons are pressed. It doesn’t matter that much here, but you’ll encounter lots of situations where the presence of the extra pair of parenthesis leads to different results (bugs). End of tip.)
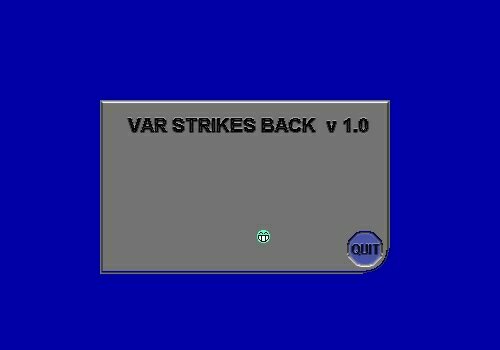
Ready to see a simple yet fully working button example? Let's run our script06 file:
I
wanted to keep the code as short as possible but we can still see a few interesting
things:
a) A panel;
b) A mouse pointer looking like a hand that can be moved around;
c) A button that changes its bitmap from
blue to red when the mouse pointer is placed over it;
d) The same button changes its bitmap from blue to green when we press and
hold the left mouse button over it;
e) If we click the "Quit" button, the program will end as soon as we release
the left mouse button.
These are the three bitmaps used for the
button:
 quitnormal_pcx
 quitover_pcx
 quitclicked_pcx
Let's see the code now:
////////////////////////////////////////////////////////////////////
#include <acknex.h>
#include <default.c>

////////////////////////////////////////////////////////////////////
function main()
{
  screen_size.x = 800;
  screen_size.y = 600;
  screen_color.blue = 150;
  mouse_mode = 4;
}

function quit_program()
{
  while (key_any) { wait (1); }
  sys_exit(NULL);
}

//////////////////////////////////////////////////////////////////////
PANEL* main_pan =
{
  bmap = "main.pcx";
  pos_x = 250;
  pos_y = 200;
  button (250, 134, "quitclicked.pcx", "quitnormal.pcx", "quitover.pcx", quit_program, NULL, NULL);
  flags = OVERLAY | SHOW;
}
I have used three bitmaps for the "Quit" button, and I have activated the mouse through mouse_mode = 4. We will ignore the mouse details in this workshop, but we will talk a little about the tiny function that shuts down the program when we click the button.
If we take a look at the button definition at the beginning of the workshop, we see that function quit_program is function_clicked, so it will run when we click the "Quit" button, which is a good thing. The first line of code inside the function tells the program to wait until all the keys and all the mouse buttons are released. The second line calls a function that shuts down the program. Don’t bother too much with that “while” line of code; its time didn’t come yet. If you are looking for a complete list of predefined engine functions, take a look at the reference manual; you will find all the functions and a handful of examples inside it.
I had to place function quit_program in front of the panel definition because (you should remember this) we need to define everything before using it. Time to examine the code for our button definition:
button (250, 134, "quitclicked.pcx", "quitnormal.pcx", "quitover.pcx", quit_program, NULL, NULL);
As you can see, I am setting the usual x and y positions of the button and I am defining three bitmaps that will be used for the button. The last two functions (function_released and function_over) were replaced with NULL, which tells the engine to do... nothing. We are using only the first function here, the one that runs when we click the button; most of the time you will not need to use the other two functions.
When you have a look at the images of the buttons above, you can see that their black corners are cut off. This is also caused by the OVERLAY flag. Flags don't only affect the panel bitmap, but also the bitmaps of other panel elements. An alternative way for partial transparency of an image is using a transparent image format with an alpha channel, for instance 32 bit TGA images. We'll learn more about that in the sprite workshop.
If you want to place several buttons on a panel simply add more button definitions to it. I encourage you to create three bitmaps for a new button; make sure that they have the same size, and then add the new "button" code to the same panel. Use NULL for all the functions associated to this button. Why don't you try that out while I prepare the next part of the workshop...
Sliders
A slider is a panel element that can be dragged with the mouse and is used to set the value for a certain variable. We can have horizontal or vertical sliders and we can set their range. Most of the time the sliders are used to adjust the volume of the sound and music, the gamma factor, etc.
This is the typical picture of your slider in action:
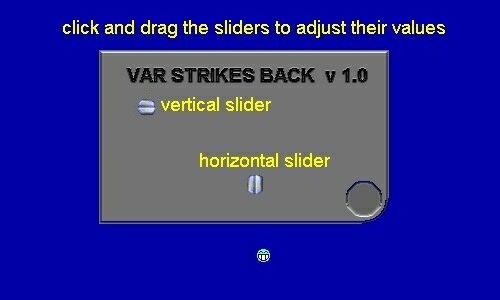
Ok, I hear you! These sliders don't look like sliders and (most of all) you can't tell their start and end positions. So why don't you paint what you need over the existing panel? Make it look like this:
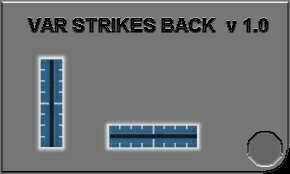
Now let's add the same sliders to our panel:

These look a lot more like sliders, aren't they? You will not be surprised to hear that the code for a slider consists of a single line; a typical slider definition is listed below:
hslider
(x, y, size_in_pixels, slider_bitmap, minimum_value, maximum_value, variable);
vslider (x, y, size_in_pixels, slider_bitmap, minimum_value, maximum_value,
variable);
As you can see, both horizontal and vertical sliders use the same definition! Let's see a slider in action: start Lite-C and open the script06_2 file:
////////////////////////////////////////////////////////////////////
var speed = 50;
BMAP* mouse_pcx = "mouse.pcx"; // bitmap used for the mouse pointer
////////////////////////////////////////////////////////////////////
function main()
{
screen_size.x = 800;
screen_size.y = 600;
screen_color.blue = 150;
mouse_map = mouse_pcx;
mouse_mode = 4;
}
//////////////////////////////////////////////////////////////////////
PANEL* main_pan =
{
bmap = "main2.pcx";
pos_x = 250;
pos_y = 200;
vslider (16, 71, 90, "slider.pcx", 0, 100, speed);
digits (15, 50, 3, *, 1, speed);
flags = OVERLAY | SHOW;
}
////////////////////////////////////////////////////////////////////
You know that I'm a nice guy so I have created a panel with a slider painted over it for you; its name is main2.pcx. I have also now used a bitmap for the mouse pointer, rather than the default hand (you'll see that a mouse bitmap is only valid within the window area and disappears in the title bar). We are using a new variable named speed; its initial value is 50 and we could have used any other name for it. We are also using a digits definition to display the value of the variable.
What are you waiting for? Go and Test run that script!
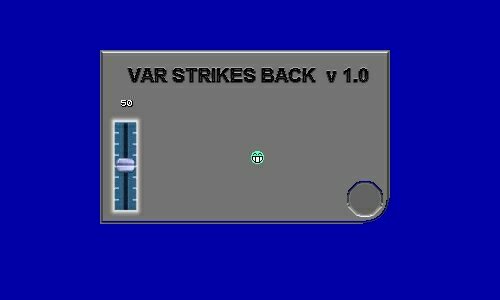
If you can't run the script06_2 file, you have forgotten to check “Use the current file for Test Run” in Lite-C’s Options / Preferences / Environment. Now click and drag the slider and see how the value displayed by the digit changes from 0 to 100. That's a quick and nice way to input a numerical value when we know its range.
Let's discuss our slider definition now:
vslider (16, 71, 90, "slider.pcx", 0, 100, speed);
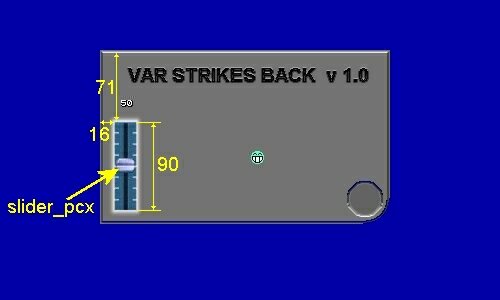
Ok, so we have set those x and y coordinates to match the picture on the panel, size_in_pixels is 90 for this vertical slider, we are using an image "slider.pcx" and we change the value of the variable named speed from 0 to 100. If you want to show all of us that you have mastered these sliders, try to add the code for a horizontal slider definition to the same panel.
Let us rest for a while.
Next: Strings, texts and fonts