Getting Started
Prior to connecting GALEP-5/5D to the PC, download and install the GalepX software from:https://www.conitec.com/en/community-products/downloads.html.Typically the software is installed in the subdirectory C:\Program Files\Conitec\GalepX on 32 bit Windows or C:\Program Files(x86)\Conitec\GalepX on 64 bit Windows.
Installing GALEP-5/5D for USB port : Windows 2000
When connecting GALEP to your PC the first time, you need to give the GALEP driver directory. Be sure do not initiate a Windows Assistant automated search for any driver - you will instead need to enter the driver directory manually.
1. Power up GALEP-5D by connecting it to the power adapter, or - in case of GALEP-5 - to an USB port. Wait until the boot process is complete (approximately 1 minute) - after that the white and red LEDs will light steadily.
2. Connect GALEP-5D to the PC through USB cable (if it isn't already). When a GALEP-5/5D programmer is connected via USB to a Windows PC the first time, some seconds after the boot process described above the Windows Hardware Assistant will automatically open for installing the USB hardware drivers and asking if you wish to use the automated Windows updater utility to seek an appropriate driver. Select the [No] option and click [Continue].
3. In the next dialog box, select the option requesting that only software from a specified source is to be installed. After this option is selected, click [Continue] again.
4. In the next step, select [Browse] and open a navigation window. Navigate to the drivers\legacy subdirectory of your GalepX installation - typically C:\Program Files\Conitec\GalepX\drivers\legacy. Conclude this step by clicking [OK].
5. Now select the option according to your GALEP hardware:
Conitec GALEP-5 Programmer - for GALEP-5
Conitec GALEP-5D Programmer - for GALEP-5D
Proceed then by clicking all the following [Continue] buttons until all the installation windows have completed and are closed.
6. Now you can start the GalepX software. The green LED will indicate that the software is running and communicates with GALEP. If other LEDs are blinking instead, look up the self-test error codes at the end of this page.
After a successful installation, you should find an entry for the GALEP-5 in the Windows network environment, this connection is set up and used by the GalepX software. You can also use any web browser with the IP address 192.168.167.12 to get some device information from the GALEP-5.
When using a Firewall, make sure that TCP/IP port 1234 is not blocked.
Installing GALEP-5/5D for the USB port : Windows XP and higher
The setup of the software suggest on default to install the USB driver at once with the software. You can also install the USB driver later manually as well. For that, change into drivers folder from the directory where you installed the GalepX software in (typically C:\Program Files\Conitec\GalepX), and run the installx86.exe for 32 bit Windows or installx64.exe for 64 bit Windows.
After a successful installation, you should find an entry for the GALEP-5 in the Windows network environment, this connection is set up and used by the GalepX software. You can also use any web browser with the IP address 192.168.167.12 to get some device information from the GALEP-5.
When using a Firewall, make sure that TCP/IP port 1234 is not blocked.
Using GALEP-5D with Ethernet port
Alternatively, GALEP-5D can be connected via Ethernet. The default IP address on the Ethernet port is 192.168.1.13 and can be changed with a web browser. No USB driver is need in that case.
Starting GalepX
Power up GALEP as described above, and connect it to the PC through an Ethernet or USB cable. Start the GalepX software by double clicking the EXE file in the GalepX folder. Normally, all GALEP devices connected to the PC or anywhere on the LAN are now automatically detected. Otherwise open the Connect Programmers panel (Programmer / Search Programmers), select Connect manually and click on Connect. If your firmware is still version 4, you'll see a message that a new firmware needs to be transferred temporarily. After connection, your GALEP should show up under the Programmers tab.
If your GALEP is the only connected programmer, it's automatically activated. Otherwise activate your programmer by selecting it in the drop-down menu below the menu bar. Under the Programmers tab it should now have a Yes under Current.
Connecting several programmers
You can connect several GALEP-5/5D programmers either to the same PC, or to other PCs in the network. The GalepX software can automatically select any of the connected GALEPs, or use them as a programmer cascade for gang programming.
Programmers connected through the USB port must be assigned a different IP address for connecting several programmers to the same PC. This is not necessary for programmers connected through the Ethernet port when the server assigns them different IP addresses. The default USB address of GALEP-5 is 192.168.167.12. For assigning a different USB address, select the programmer in the Programmers List, click [Properties], enter a different IP address under [Configuration], then click [Apply & Reboot]. IP Adresses on a LAN must begin with 192.168. Make sure not to select an address that is already occupied by another device on your network.
When the programmers are connected and appear in the Programmers List, click [Gang Programmer...] to combine them to a Gang Programmer. It will then appear as a new programmer in the list. Actions in the Device Window are then performed simultaneously on all combined programmers.
The GALEP maintenance page
When connected to the PC through USB or Ethernet, GALEP-5/5D acts as a HTTP server. You can open its web page by entering its IP address - 192.168.167.12 for a USB connection, 192.168.1.13 for an Ethernet connection - into the address field of your browser. The web page provides hardware information and allows updating the firmware.
Resetting GALEP to factory settings
If you assigned different IP addresses, but don't remember them anymore, you can reset GALEP-5/5D to its factory settings.
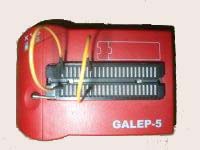
- Use two wires to connect pin 1 and pin 8 of the DIL socket with the pins on the opposite side (see image).
- Power up GALEP by connecting it to a USB port or the power supply
- Wait until you see a moving light on all 3 LEDs.
- Remove the wires.
- Switch off GALEP by disconnecting it from the USB port or power supply.
- Start GALEP again. Now its IP addresses are reset to 192.168.167.12 (USB) resp. 192.168.1.13 (Ethernet).
|
 |
GALEP socket test
GALEP-5/5D can perform an extended self test that checks the connection of all socket pins.
- Use ~100 Ohm resistors to connect all pins of the DIL socket with the pins on the opposite side.
- Power up GALEP by connecting it to a USB port or the power supply
- Wait until you see either a moving light on all 3 LEDs that indicates success, or a blinking red LED that indicates a problem with one of the socket pins or with the power supply.
- Remove the wires and restart GALEP.
|
LED light codes
On startup GALEP performs a self test and self calibration. A hardware error is indicated with the three LEDs. Here's a list of the 'light codes' and their meaning:
| Code |
State |
| White blinks |
Loading second stage from flash |
| White on |
Starting Linux kernel |
| Code |
State |
| Red on |
Loading second stage from flash |
|
and starting Linux kernel |
| Code |
State |
| All three blink |
Memory test failed (Hardware failure) |
| Red on, White on |
Device successfully started and ready for connection |
| White on, Green on |
Device connected with PC software |
| Green on, Red on |
Power on self test in progress |
LED codes during power on selftest
| Code |
State |
| Red blinks 5 times |
Discharge test failed |
| Red blinks 3 times |
Pindriver test failed |
| Moving light |
Self test success |
LED codes in conjunction with Web Frontend
| Code |
State |
| Green on, Red on |
Firmware upgrade in progress (Don't turn off!) |
► latest version online