Workshop 04: Bitmaps and panels
Bitmaps
A bitmap is nothing more than a picture file created with a painting program. Lite-C can use many bitmap formats: pcx, bmp, tga, dds, jpg..., either 24 bit true color (highly recommended) or 8 bit (not recommended). I can't even think why you would want to use an 8 bit = 256 colors image... wait, I know why!
a) Your game looks too good and you want to make it look
uglier;
b) All your
customers have old 3D cards (like S3 Trio 3D or Voodoo1) and you know that the
game will run faster on their PCs if you use 8 bit bitmaps.
You should use true color bitmaps (textures) all the time, trust me! I wouldn't buy a game that uses only 256 colors for its levels. On the other hand, 32-bit Targa (tga) bitmaps contain an additional alpha channel which gives a transparency value for every pixel. You can draw the alpha channel using your painting program (Photoshop, Paint Shop Pro, etc).
How do we define a bitmap? Take a look at the example below:
BMAP* health_pcx = "health.pcx";
Ok, so we have the keyword BMAP ending with a asterisk (*), followed by our bitmap name and then we write the corresponding file name between the " " (quotation marks). We end our script line of code with a semicolon, as usual. I have named my bitmap health_pcx but you can use any other name, for example:
BMAP* test = "health.pcx";
Do you see what I see? When I will want to use the bitmap in my game (maybe a few days or weeks later) test will not be a relevant name for me. I will have to check the definition again and again to see what "test" means. Ok, let's define the bitmap this way:
BMAP* health = "health.pcx";
Do you think that you will remember what health is after a few weeks? I can hear you asking: is health a var, a bitmap, or what? Not to mention that you will get errors if you try to define a var that has the same name with the bmap... I encourage you to use meaningful names for all the resources used in your projects. It is enough for me to see the name health_pcx and I will know that I'm talking about a bitmap that uses a pcx file. The definitions I use for the bmp and tga files are similar:
BMAP* ammo_bmp =
"ammo.bmp";
BMAP* armor_tga =
"armor.tga";
Other people use other naming methods, for instance bmHealth (the prefix bm meaning bitmap). Whatever you use, make sure that you keep it throughout your code!
The bitmaps are important resources for our games; whenever you see a picture on the screen, there's a bitmap definition behind it. So what are we waiting for? Let's unleash the bitmap power! I have created a cool picture and I want to display it on the screen right now! Ok, we can do that but first we need to learn a few things about...
Panels
Every game needs to use panels! If your game needs a dashboard, a cockpit, a button, a splash screen, an inventory, etc you need to use a panel, a rectangular bitmap that is placed "over" the screen. Every game uses a 2D engine to draw all the 2D stuff; Lite-C includes a 3D engine and a 2D engine as well.
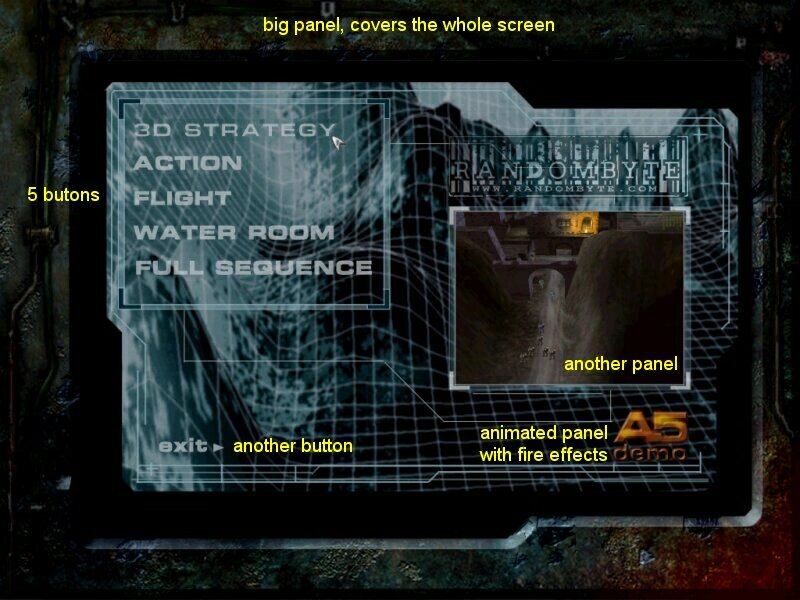
Before we begin, I want to show you some panel examples from one of my demos:
What can we create with these panels? I mean, what
can we do with the GUI (Graphical User Interface) objects inside lite-C?
a) Standard panels,
images that can be applied over the screen, covering a part of our 3D
world;
b) Digits, panel
elements that can display text and numbers;
c) Windows, panel
elements that can be used for a compass, maybe for an animated player bitmap, a
health bar, etc;
b) Buttons,
clickable panel elements that can run functions;
e) Sliders, panel
elements that can be used to set a value by moving a slider, the same way you
set the sound volume in a game;
f ) Needles,
rotating elements mostly used for round instruments like clocks, speedometers, etc.
Now you see why these panels are so powerful - they can do a lot of interesting things for our games. Read a)... e) again and then take a good look at the picture below to see how all these elements look like:
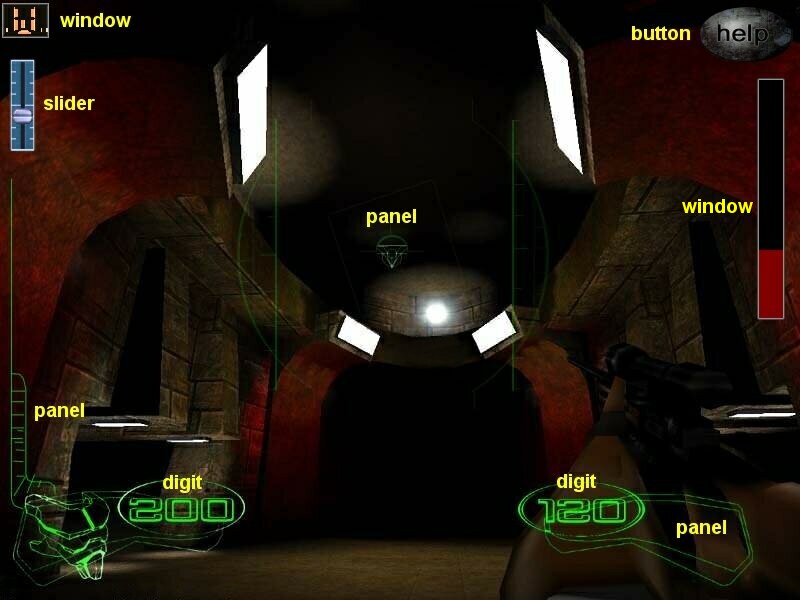
Don't even try to imagine that I use all these panels and panel elements in one of my games! Many of them were added with a painting program, because I wanted you to see what you can do with them right away. Let's get to work!
Start Lite-C and open the file named script04 inside the workshop04 folder:
////////////////////////////////////////////////////////////////////
BMAP* first_pcx = "first.pcx"; // my first bmap
PANEL* first_pan = // my first panel
{
pos_x = 0;
pos_y = 0;
layer = 1;
bmap = first_pcx;
flags = OVERLAY | SHOW;
}
/////////////////////////////////////////////////////////////////////
function main()
{
screen_size.x = 800;
screen_size.y = 600;
screen_color.blue = 150;
}
Not too much code to look at, isn't it? Let's Test Run our script:

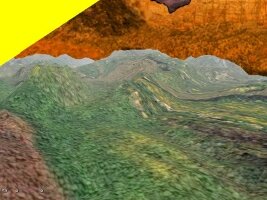
This panel looks pretty nice so you can be sure that it wasn't created by me; I have used a sample panel from GUI stuff. It looka like the panel can have an irregular shape as well; why was I mentioning those rectangular bitmaps? Wait a minute... the bitmap is indeed a rectangular bitmap!
The engine sees as transparent every pixel that has its red (R), green (G) and blue (B) colors equal to zero. This way we can create panels that have any shape, like the one used in my example. Let's see another example; the rectangular bitmap on the left is displayed as a yellow triangle in the level:

Time to examine the definition for our panel in detail:
PANEL* first_pan =
{
pos_x = 0;
pos_y = 0;
layer = 1;
bmap = first_pcx;
flags = OVERLAY | SHOW;
}
What do we have here? First, the keyword PANEL* followed by the name of the panel. I chose a name that ends with _pan so I will know that this is a panel without looking at its definition over and over. Of course that you can choose any other naming convention, like pnFirst. Nothing new so far... I bet that the interesting stuff is contained between those curly brackets.
1) bmap = first_pcx tells the engine to use the previously defined BMAP named first_pcx. I'll show you the bitmap definition again; just remember to define the bitmap first and create the panel that uses it after that.
BMAP* first_pcx = "first.pcx";
Tip: If you don't want to use a previously defined BMAP, you can rewrite the panel definition this way:
PANEL* first_pan =
{
...
bmap = "first.pcx";
...
This defines a BMAP internally and uses it for the panel.
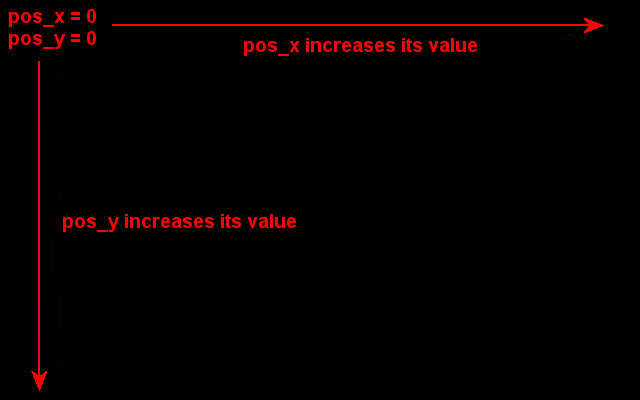
2) pos_x = 0 and pos_y = 0 will display the panel at x = 0 and y = 0 on your screen. Take a look at the upper left corner of your monitor - that's the point for pos_x = 0 and pos_y = 0.
Ok, so if I choose a bigger pos_x value, the panel will be moved towards the right... what if I choose pos_x = 200 and pos_y = 300? Let's change the script right now!
////////////////////////////////////////////////////////////////////
PANEL* first_pan =
{
pos_x = 200;
pos_y = 300;
layer = 1;
bmap = first_pcx;
flags = OVERLAY | SHOW;
}
/////////////////////////////////////////////////////////////////////
Time to Test Run our level... what's happening here?
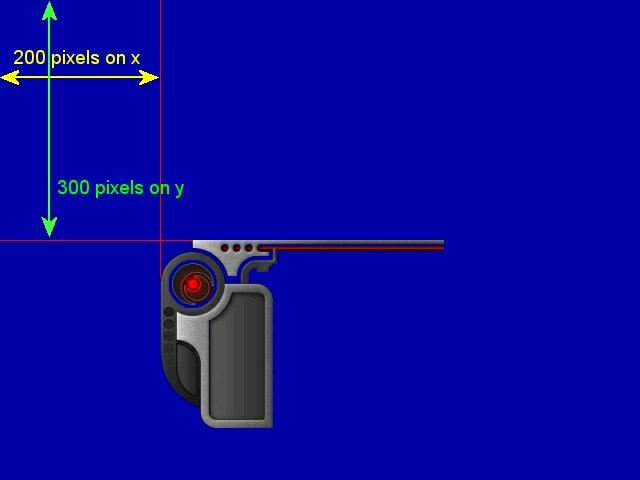
A simple image tells us more than 1,000 words, isn't it? The engine will not complain if we feed it with wrong pos_x and pos_y values; if these numbers are too small (below zero) or too big, you might not be able to see your panels at all, because they were placed outside the screen!
Let's play a little game: I give you a bitmap of 150 x 130 and I ask you to place it on the screen, in the lower right corner. What pos_x and pos_y values will you choose for it?
Solution (don't peek): The screen has 800 x 600 pixels, so we have 800 pixels on x and 600 pixels on y. Our panel has 150 pixels on x and 130 pixels on y so it needs to start at 800 - 150 pixels on x and 600 - 130 pixels on y, if we want it to end at (800, 600) pixels. The correct answer is pos_x = 650 and pos_y = 470.
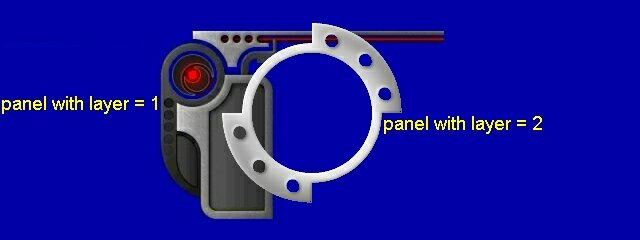
3) The number associated to layer determines the order of the panel, if it overlaps with other panels. Elements with a higher layer value will be placed over the elements with a lower layer value. If you define a second panel and use layer = 2; inside its definition you will see that it appears over the panel with layer = 1; just like in the picture below:
This way you can combine several bitmaps to create great looking (maybe sliding) panels and so on.
4) Ok, it looks like we are learning some new things here...
flags = OVERLAY | SHOW;
This line allows you to set some flags (properties) for the panel. Let's talk about these flags right now:
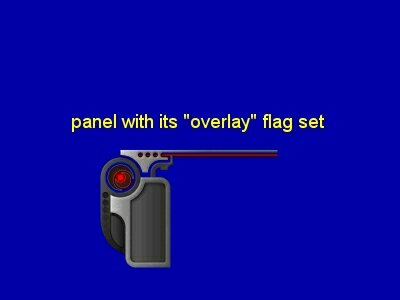
- OVERLAY tells the engine to see as transparent the parts of the panel that are drawn using RGB = 000. If we don't use the OVERLAY flag we will see the whole panel bitmap, including its black parts (unless the bitmap is an already-transparent TGA or DDS image). By the way, panel flags like OVERLAY also affect all other elements of the panel - we'll come to that in the next workshop.

- SHOW tells the engine that it should display the panel at program start. If you have set the SHOW flag for one of your panels but you can't see it on the screen, check your pos_x and pos_y values - they might be too big or too small.
- Finally, " | " tells the engine to set both flags for that panel. "|" is the OR operator in C and is normally used to combine flags together. Make sure to leave a space character on both sides of the "|" operator.
The following workshops will teach you to create some panel elements: digits, windows, buttons, sliders and bars.