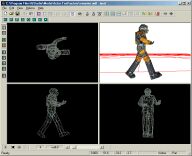
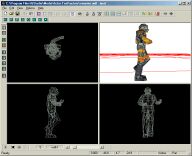
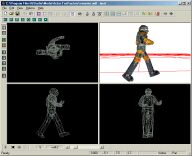

Example for a walk scene consisting of 4 key frames.
|
Model Animation Guide |
Gamestudio offers two methods to animate a model: Vertex Animation and Bones Animation. In both cases you animate the model by Key Frames - certain model poses that appear as animation if played sequentially. A number of key frames that belong to the same animation is called a Scene. The engine animates the model by interpolating between those key frames - therefore they should not be too different within a scene, otherwise the animation would look strange or jerky.
Example for a walk scene consisting of 4 key frames.
In vertex animation, mesh vertices or model parts are moved, scaled or rotated, and the new mesh positions are stored in each key frame. This is sufficient for animating robots or machinery, but does not produce good results when animating humanoid models.
For bones animation you create a skeleton, consisting of a 'tree' of bones. Each bone controls a number of vertices of the model mesh. For instance, an arm bone controls the vertices of the arm part of the mesh, and a head bone the vertices of the head part. Each bone, except the first one, can be linked to a 'parent' bone by a joint. If a bone moves or rotates, all linked bones move or rotate with it. The model is animated by rotating bones about their joints, thus producing a more natural animation for humanoids. Bones animated scenes can be combined and therefore allow for more complex animations, like an actor running and shooting at the same time. A bones animated model has a smaller file size than a vertex animated model, but consumes around 50% more memory and processor performance when rendering.
The following animation guidelines are set up to help you design your bipedal (humanoid) model to animate correctly with Gamestudio's template script functions, as well as with the animation and walking examples in the manual.
► latest version online